September 30, 2026
Changing one assumption in your calculations sounds simple, until you realize the change affects six figures, and you made the figures eight months ago. Which script made Figure 4? Was it run with the current version of the data?
Avoid this problem by setting up every paper the same way, from the start. The structure takes just a few minutes to create, and it pays off every time you revise a paper, respond to reviews, or come back to a project years later. This article describes that structure, and a template repository lets you copy it directly.
Each paper gets its own folder, organized as shown below.
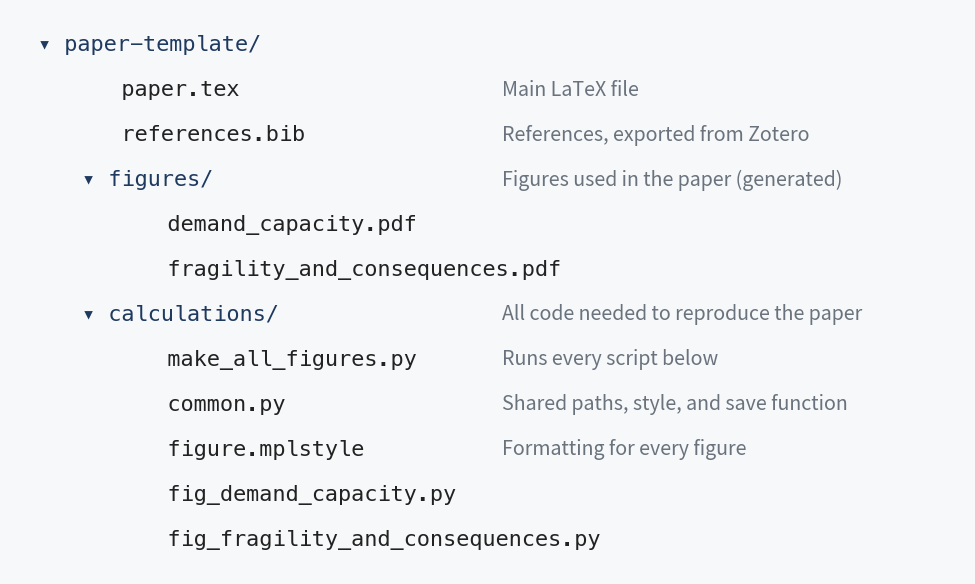
The root folder stays clean. It holds only the main LaTeX file and the reference list. Everything else goes in one of two subfolders.
The calculations folder holds all of the code and data needed to produce every figure in the paper. The figures folder holds the figures themselves. The calculation scripts write to figures, and the LaTeX file reads from it. Keeping the folders separate means that you can have several calculation folders writing to one place, and that the files a journal needs at submission are already separated from the code.
A \graphicspath{{figures/}} command in the LaTeX preamble points to the figures folder, so you include a figure by file name alone.
If you write in Overleaf, the folder splits in two. The paper itself (the LaTeX file, the references, and the figures) lives in Overleaf, where your coauthors can edit it. The calculations folder stays on your computer, where the code runs. The section below describes how to connect the two.
The calculations folder includes a script, make_all_figures.py, that runs every other script in order. Running it regenerates every figure in the paper.
This is the most useful habit in the whole setup. After you make a change, run the script and recompile the paper to get an updated version. When you come back to a project years later to look up a detail, you can run the script, watch all of the results reappear, and then work backward to find the code behind the relevant figure. It is also the first step toward sharing your code when the paper is published, because the code already reproduces the paper.
The rule that makes this work: never edit a figure by hand after the code produces it. If a label or axis limit needs to change, change it in the code.
Every script loads the same matplotlib style file, which sets fonts, font sizes, line widths, and colors. The figures in the paper are consistent by default, and if a journal wants different fonts or sizes, you change one file and rerun. The template uses the same style file as the figures in my book, Communication by Design, including a colorblind-safe palette.
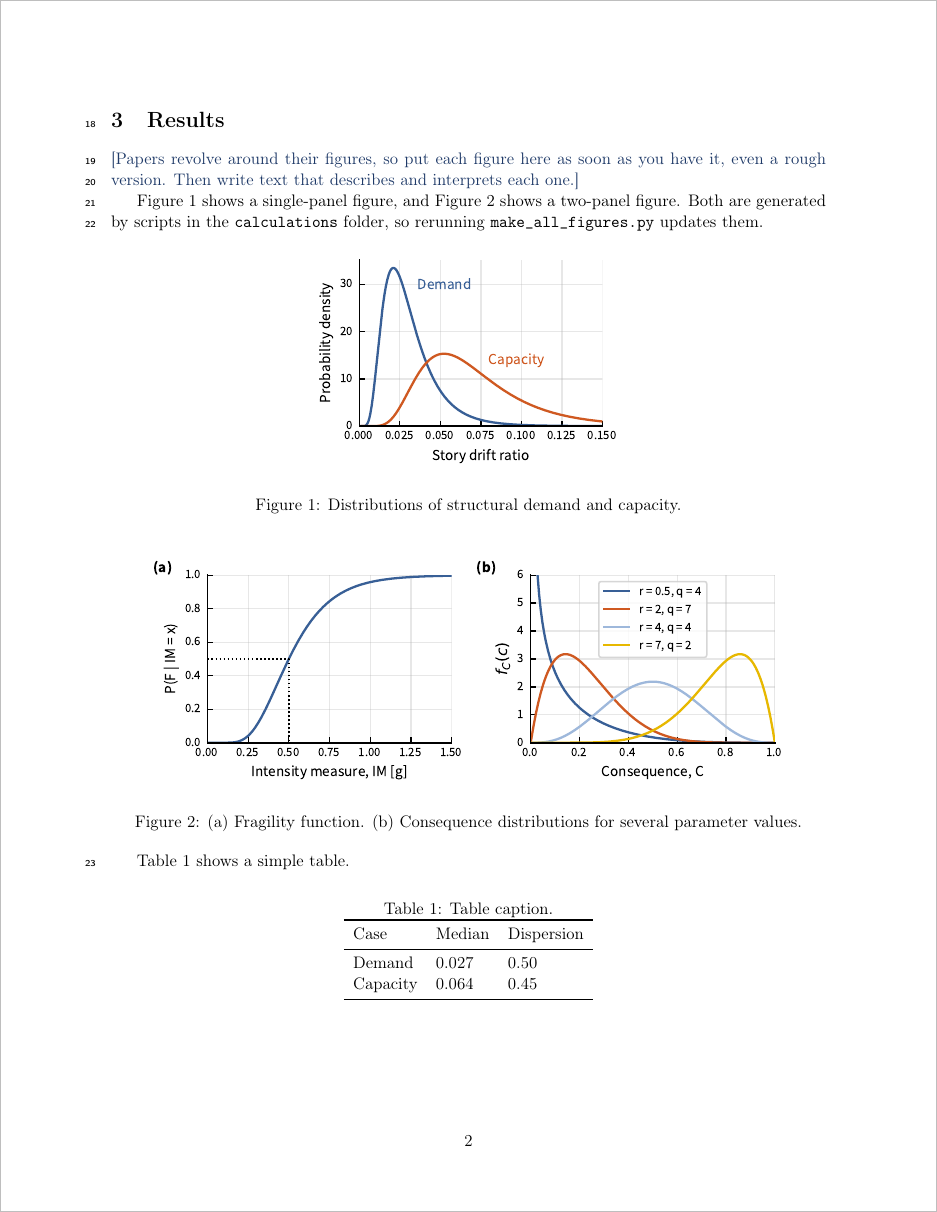
A small shared module, common.py, loads the style file and defines where figures are saved. Each figure script imports it, so no script needs its own formatting code. The page below shows the template’s two example figures, each produced by its own script.
Many authors write their paper on Overleaf in the cloud, while performing calculations on their local computer. You can keep this setup with one change. Overleaf can sync each of your projects with a folder in your Dropbox, under Dropbox/Apps/Overleaf/. A file you change in that folder appears in Overleaf within seconds, and edits made in Overleaf appear in the folder. Dropbox sync is a premium Overleaf feature, but many universities provide premium accounts. Only the project owner needs to set up Dropbox. Coauthors keep editing in Overleaf as usual.
This sync lets the code update the paper directly. Set figure_dir in common.py to the figures folder inside your synced Dropbox folder, for example:
figure_dir = os.path.expanduser('~/Dropbox/Apps/Overleaf/My paper/figures')Now when you run make_all_figures.py, the new figures go straight to Overleaf, and the next compile shows them. No manual uploads are needed.
References work the same way. The Better BibTeX plugin for Zotero can export a .bib file and keep it updated as your library changes. Export it to the same Dropbox folder, and references you add in Zotero appear in Overleaf. Just make changes to references in Zotero rather than in Overleaf, because each export overwrites the file.
Before writing any prose, decide on the paper’s main conclusions, its audience, and its target journal. Everything else in the paper builds toward the conclusions, so settling them first keeps the writing focused. (I describe this process in more detail in the “Designing research papers” chapter of Communication by Design.)
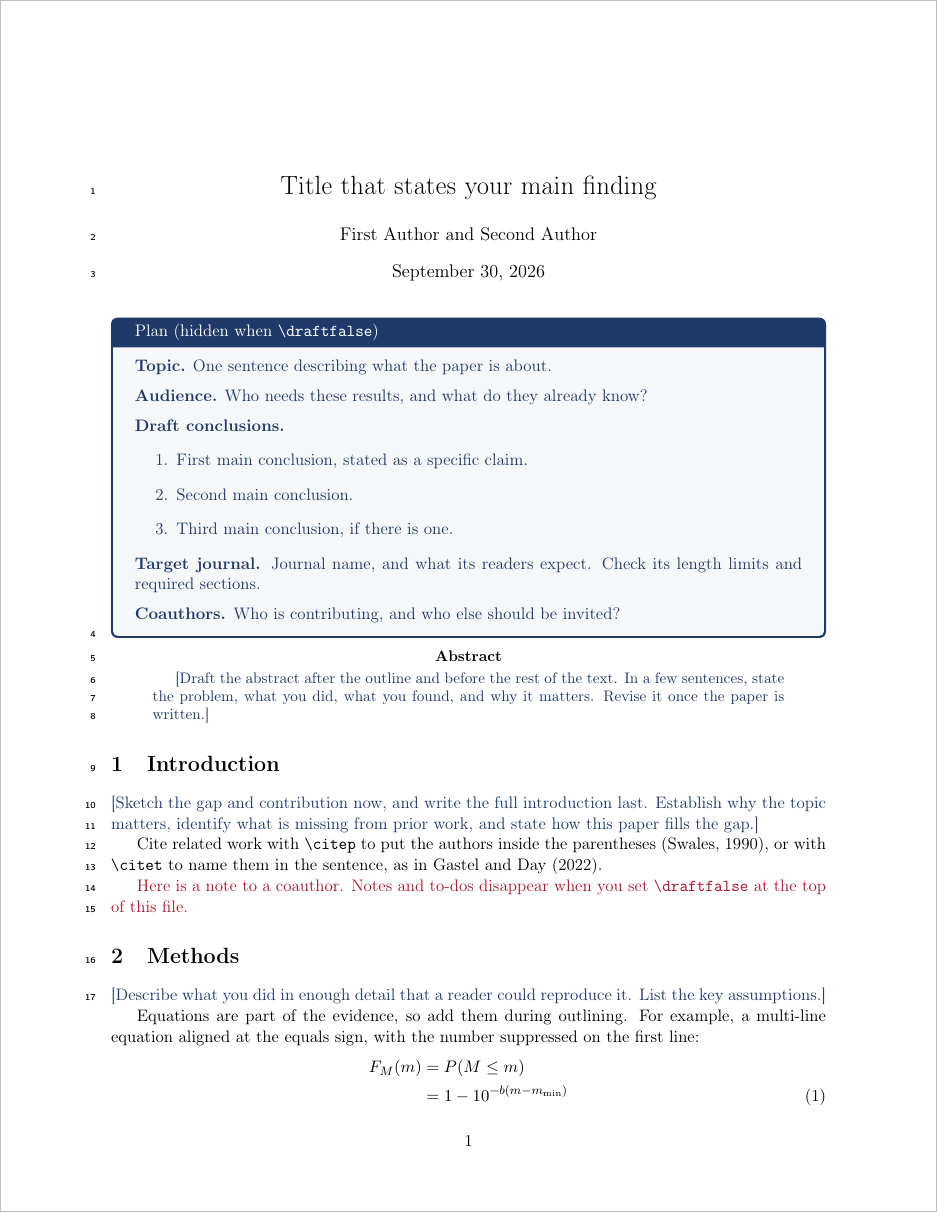
The template puts these decisions in a planning box at the top of the draft, so you and your coauthors see them every time you open the file, and you notice when the writing drifts away from them.
Below the plan, the template has placeholders for the paper’s main sections, each with a short note about what the section needs to accomplish. Replace the notes with your own outline, then add draft figures as soon as you have them. Papers revolve around their figures, so having them in place early helps you check that your evidence supports your conclusions before you invest in polished text.
Drafts collect notes to coauthors and reminders to yourself. Write these with custom commands, \note{} and \todo{}, that display as colored text. A single switch in the preamble, \drafttrue or \draftfalse, shows or hides all of them, along with the planning box, so nothing slips into the submitted version. With coauthors, give each person their own command and color. The first page of the template, in draft mode, is shown below.
The template repository contains the folder structure, the example scripts, and the draft skeleton, along with a few examples of citations, equations, and tables. Replace the examples with your own work, and keep the structure.
To start a new paper on Overleaf:
Apps/Overleaf/.calculations folder out of that Dropbox folder to wherever you keep your code. Moving it removes it from Overleaf, which keeps the code out of your coauthors’ way.figure_dir in common.py to point back to the project’s figures folder, and point your Better BibTeX export at references.bib.If you compile LaTeX on your own computer instead, copy the whole folder and keep it together. The default paths work as is.
Sign up for very occasional updates about new offerings.
